Top 10 Resource Management Tools in 2024
Looking for a resource management software for your company? We’ve made a list of 7 tools to choose from.
Sometimes well mastered time management strategies aren’t enough. But how do you track employee hours? How do you track employee hours? Do you use employee time tracking software and analyze reports? Do you have an Excel sheet or an actual paper timesheet devoted to logging hours? Or perhaps you don’t track time spent on various projects at all?
The article contains:
At Teamdeck, we know that effective timesheet management offers advantages to the company itself, but is also beneficial for the employees. Both sides are better off when the process is transparent and efficient. In this article, you’ll learn how to create a powerful timesheet report using Teamdeck’s reporting features. Based on this report, you will be able to calculate the payroll, invoice your clients and understand productivity patterns within your team.
But, before we show how to create a timesheet report, a few words about timesheets themselves. A timesheet is a table with data that contains tracked times a particular employee has worked during a certain time period and/or task, or project for a certain client. For this objective, many different methods are used to record timesheets. From a paper, dedicated timesheet software, employee time tracking app, or resource planner with time tracking and timesheet reports features.
In order to create a basic report based on your team’s timesheets, you need to access their logged hours. Teamdeck offers time tracking features (including a mobile time tracker), so you’ll be able to create reports using your employees’ tracked time data.
Not sure how to track time with Teamdeck? Our knowledge base should help.
Ready to start building your timesheet report? Log in to Teamdeck and head to the reporting section – you’ll find it in the top menu. Now, when you click on Create new report, you will have two options:
While reporting templates are certainly useful and may speed up your work, in this article you’ll learn how to create timesheet reports from scratch. Go ahead and click on create custom.

Now, that you’ve generated an empty report, you can easily feed it with data. Don’t forget to name it and select an appropriate date range (both elements can be edited anytime).
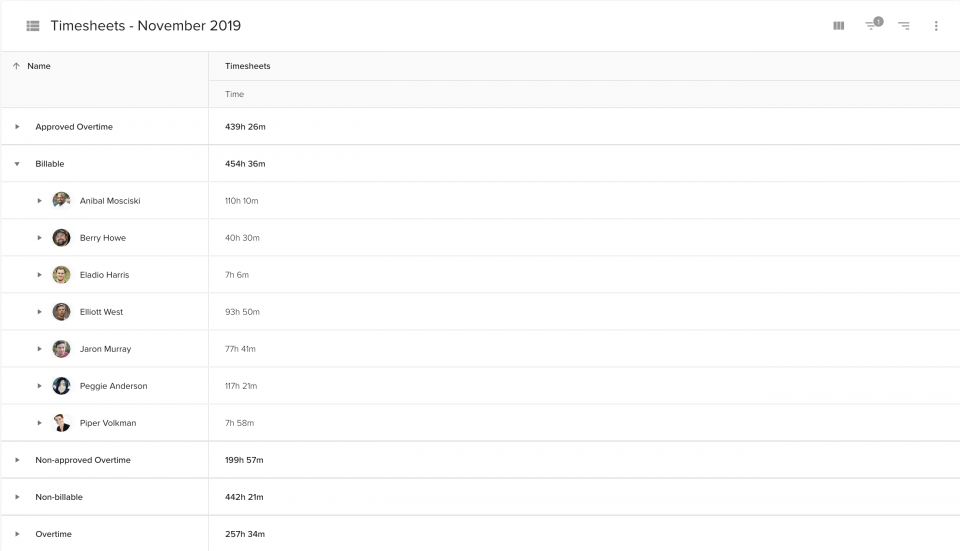
Let’s start by adding a new table (click add table) with basic information about your team’s time. You’ll notice that timesheets are already listed in your new table, together with Bookings, Availabilities, and Vacation data. If you want to analyze timesheet information exclusively, you can remove the other columns by clicking on a trash bin icon. You should end up with a table divided into different projects.
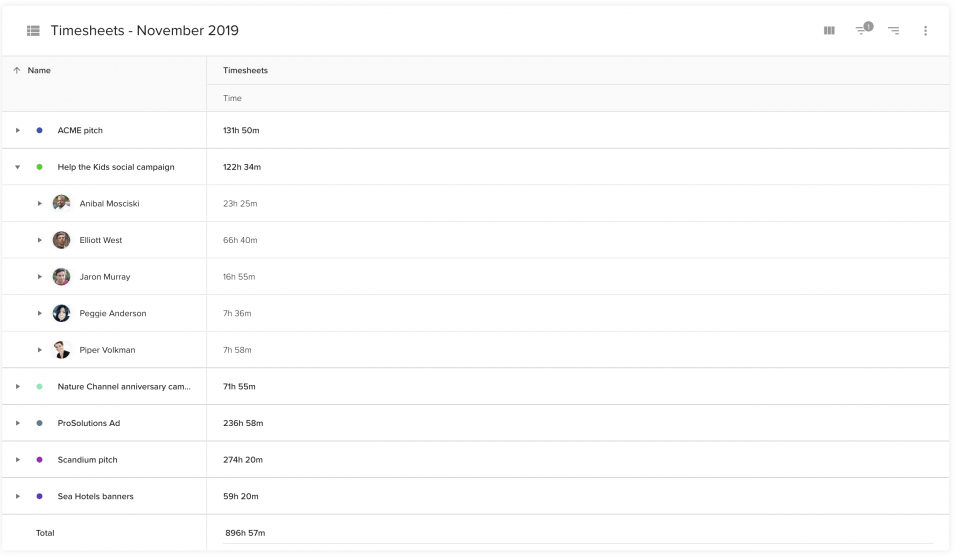
Want to see logged hours of particular user and employee on your team? Simply change the way the data in your table is grouped:
Look at the screen above. Depending on your needs, you can group information by people. projects, weeks, and so on, all in order for you to better understand your team’s workload and team performance (more about workload management).
Such a table can act as a base for calculating employee payroll. You can also filter the data to include e.g. only particular projects. Such a report is then a great addition to your client invoice if you’re charging by the hour.
Click on a plus icon in the bottom right corner, if you want to add more elements to your report. Visualize the timesheet by creating a line chart or a bar chart. You may also want to check the proportion of different projects in your team’s total logged time. A pie chart will be helpful here:
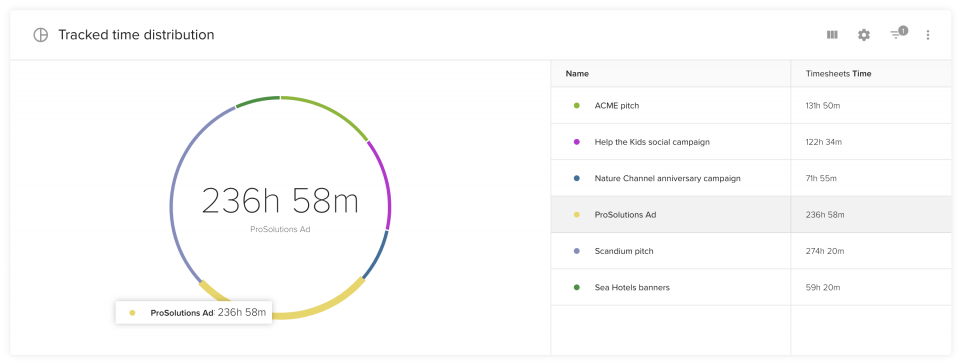
Analyzing the data with different visualization methods may help you uncover new insights – e.g. the fact that one project boasts 30% of your team’s time, even though it’s hardly as profitable as other things you have in the pipeline.
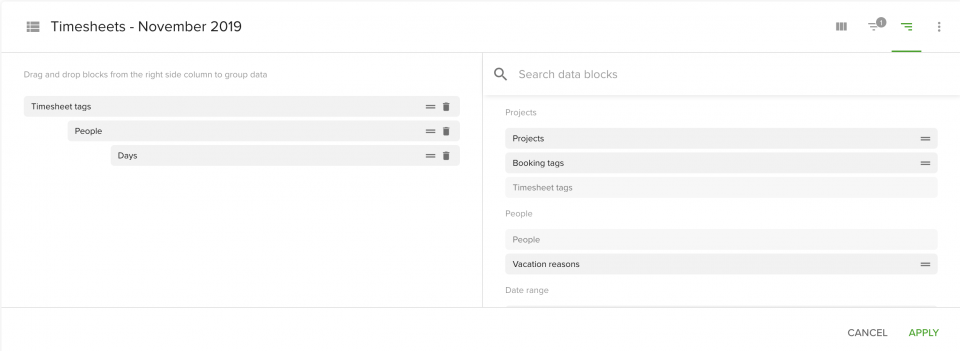
Having access to your employees’ logged hours is definitely valuable, but drilling down this data may prove to be even more beneficial. Having read the paragraphs above, you know how to group your data into basic categories (people, projects, time periods). Now, it’s time to get a little bit more sophisticated and introduce custom categories that you can set up on your own. These custom insights can be generated using:
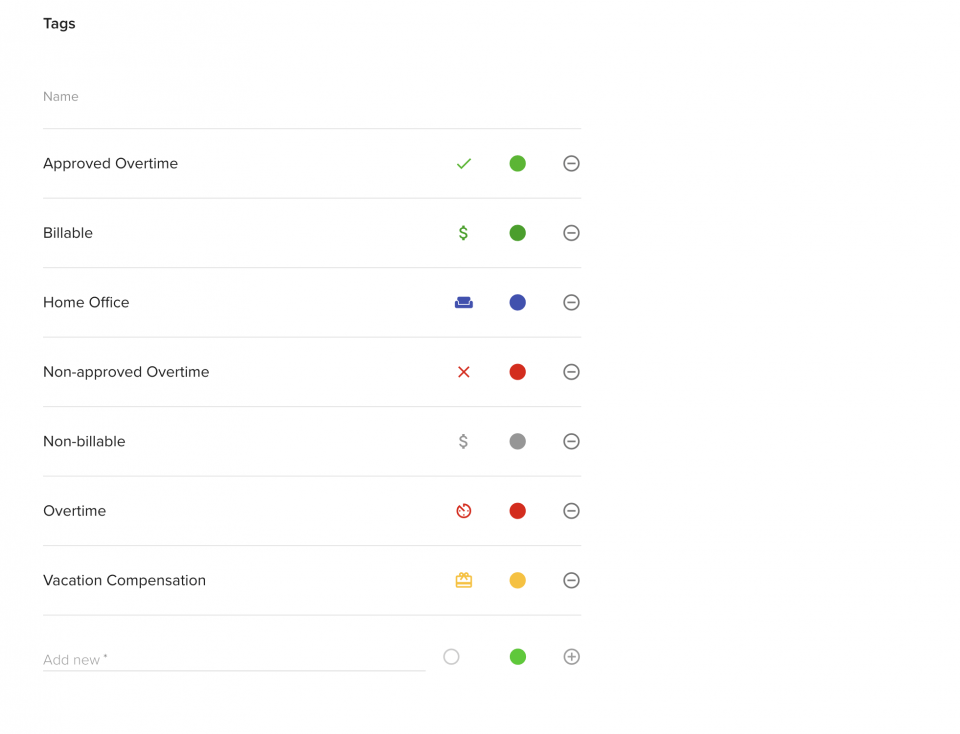
What’s the difference between these two? Timesheet tags may be added to each tracked time entry, so they are describing the logged hours themselves. Common examples of timesheet tags are billable, non-billable, and overtime but you can add your own tags to provide more information to the timesheet view. Custom fields, on the other hand, describe either projects or people.
Most of our clients use the “Job title” custom field to be able to group their workforce into different categories based on their competencies. You may also want to group your projects into different “Client” categories, especially if you’re working on multiple projects for a number of companies.
You can manage both tags and custom fields in the Settings of your organization.
Why is it useful to have custom categories you can group all your data into?
First of all, it allows you to create a view that makes 100% sense to your company. For instance, you can compare timesheets from different office locations of your company.
Timesheet tags allow you to drill down the data and monitor a category of choice: for example, you can group together timesheets tagged as overtime, billable or even home office, if a given breakdown makes sense for your organization.
Want to get even more insights into your team’s timesheets? You can add a column called “Timesheet description” to import every time entry’s description into your report. Descriptions are comments made by your team members when they log in their timesheet entries. Seeing these descriptions will help you realize what exactly caused certain trends in your team’s timesheets.
Book a consultation with Teamdeck experts. We’ll help you set up even the most sophisticated reports.
One of the benefits of time tracking is that you can keep track of your employees’ overtime. We’ve already mentioned that one way to do that with Teamdeck would be to ask your employees to use a timesheet tag overtime every time they’re working extra hours.
However, you can also calculate overtime without having to rely on correct tagging. How? All you need is the number of estimated working hours (or available hours) and, of course, the number of actual/logged hours.
Teamdeck help with overtime management as well. It allows you to store both the available hours (as your employees’ availability as well as estimated working hours (bookings). Having this kind of data at your disposal, you can create an accurate report of your team’s overtime. Let’s create it step by step.
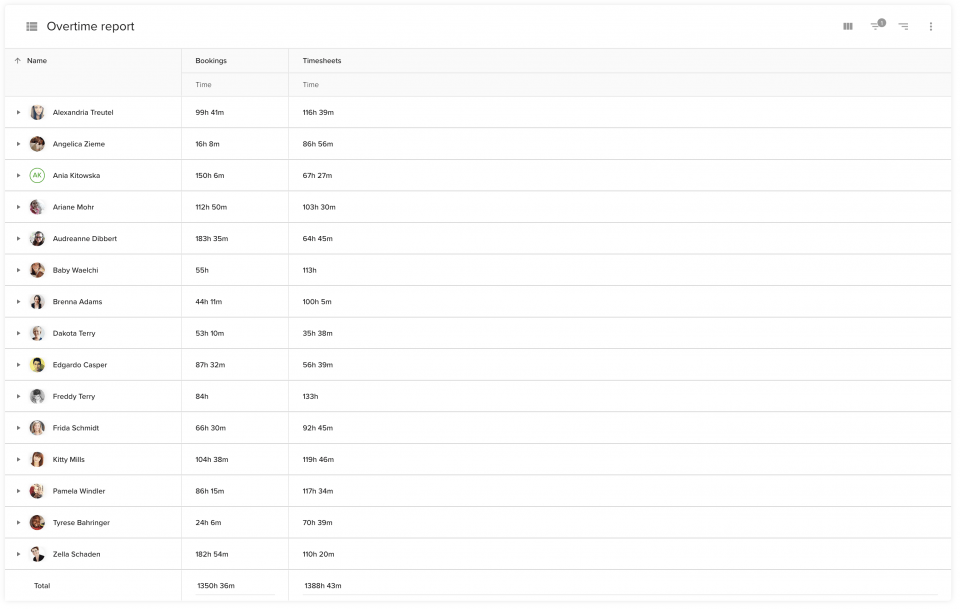
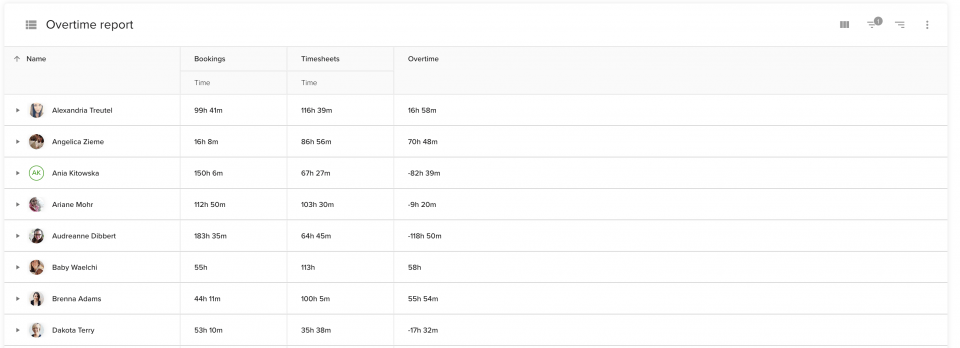
Within the Add custom calculation field form, change the data format to Time and enter the following formula: Timesheets: Time – Bookings: Time. Click Save and apply.
Whether you decide to use the Overtime timesheet tag as a marker of extra hours or to calculate the Overtime column by yourself, you can still group the data in different ways, in order to better understand who and under what circumstances had to put in overtime.
One of the potential use cases could be to group your table by Job Titles (it’s a custom field) and then see which roles had extra hours spent on work. This way, you can forecast human resources and recruitment needs or improve your resource allocation.
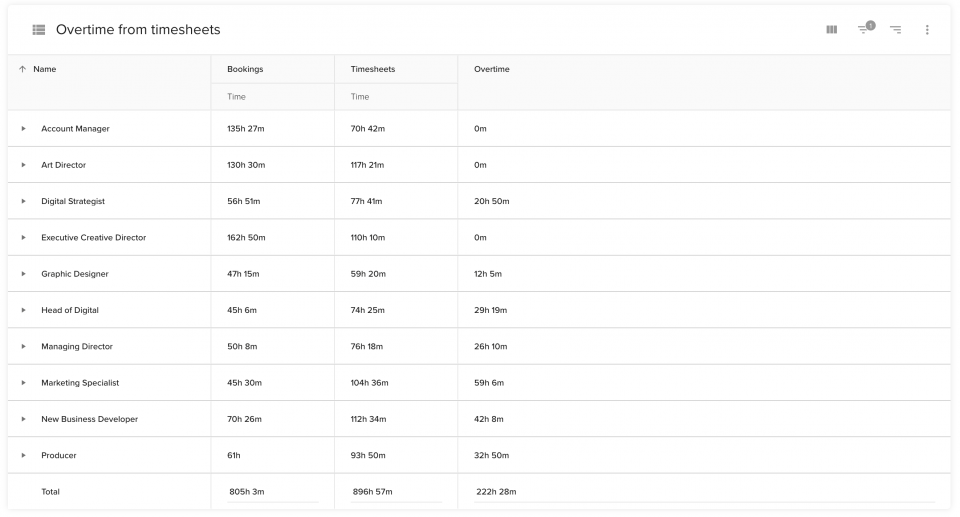
Looking at the overtime hours report above, we can probably say that this company should hire additional marketing specialists, as the current employees in this role have a lot of overtime.
Once you save a report in Teamdeck, it stays in your dashboard. Revisit your report regularly in order to see new patterns in the data and spot potential improvement areas.
Do you want to share these insights with your team? Do it directly in the app by clicking share. You can also export the data or generate a link to your report, so that it’s accessible by people from external organizations, e.g. your clients or payroll specialists.
There is virtually no limit to what can be done and analyzed with Teamdeck reports. Most importantly, reporting features are available for all users of the app. Regardless of whether you have 15 or 150 people on board, you’ll get to use robust timesheet reports to your advantage.
Looking for a resource management software for your company? We’ve made a list of 7 tools to choose from.

Did you know that 77% of the teams that perform well on projects employ project planning software? Marketing campaigns are the backbone of sales. An effective marketing campaign creates more avenues for a business to gain from...